RGBs and ARGBs have been a thing for the past few years and the trend is still going strong in 2022. They are the new way to make your PC Build even cooler. And as this style has become more and more popular over time, a lot of innovation has taken place. So, you can now get these LED lights not only for your case but also for your Motherboards and Graphic Cards.
Up until recently though, these LED lights came fixed and were not interchangeable until and unless they came with extra features, such as remotes, etc.
But those days are of the past now as there are multiple software out there now which can help you with these compatibilities. These programs make your user experience more personal and justify all the money that you spend on these lights.
In this article, we will talk about Aura by Asus and teach you how you can download it as well as install it in a few easy steps. We will also go over some of the things that you need to know if you are going for this product. And give you an overview of the features that you get too.
If you do not want to go through the entire article, here is a quick summary of it:
To Download and Install ASUS AURA, Go to their website (Or Click Here) and Press on the Red Button that says “Download”. After that, extract the files and start the Setup Process. The installation wizard will guide you through the process and install the program on your computer. You can launch it directly as the process is complete.
Table of Contents
1. What is Asus Aura?
Asus’s Aura is a free utility that is offered by Asus on their website so anyone can go get it whether if you own an Asus product or not.
This utility is for everyone who has worked on, is about to, or will in the future build a PC. As with this utility, you get the options to customize and personalize all your RGB and ARGB LED lights the way you want to.
This type of utility has been offered by Asus and many others before too. But the version of this RGB utility that you can install right now, is one that is much smoother to use.
You get different features such as turning ON or OFF the RGB lights, connecting them with your hardware components so that they mimic the usage, or simply just change the colors as you want them to. This is really useful because, before these utilities, you did not have a lot of functionality when it came to these RGB and ARGB lights.
2. How to Download Asus Aura?
There are two different ways to download this Utility and we will show you both of them.
Starting off from:
a) Downloading from their website
First of all,
i) Go to their website or Click here, Asus Aura Lightening Control Download

ii) After that, click on the Red Button that says “Download”

b) Downloading According to the Product Key
Another way to download the Lightening Control is to use the specific product key of your hardware whether it be Motherboard or Graphics Card. This is helpful as even though Aura is compatible with a lot of different components out there, in order to be sure, you can just search for your specific hardware.
So for this,
i) Go to the Download Center
ii) Specify your Product Type and then your Product Series & Model OR you can just Search for your Model Name Directly.
iii) After you have found your motherboard for example, Click on the option of “Drivers & Tools”

iv) Then Choose the “Operating System”
v) Finally, Download the LED Control under Utilities
Extracting the Setup Files
Once done, the download will automatically start for you. You can see the progress at the bottom of your screen. If not, you can press “Control + J” to go to downloads to see it.
i) After it has completed, click on the file at the bottom of your screen or the one that you see in the downloads.

You will be directed to the app/software that you have for archiving and viewing archived files. If you do not have one already, we advise you to get WinRAR.

ii) Click on the file titled “ArmoryCrateInstallTool” to automatically extract it. If you want to choose the destination where you want the file to go, you can click “Extract”.
When the extracting is done, you will see this open as a separate window.
When you have used one of the two options mentioned above, you will then need to move on to the Installation part of the Software. This is explained below.
The Installation steps are the same and do not depend on which way you download the software.
3. How to Install Asus Aura Sync

You have the option to choose between the following three options which are either installing the Armory Crate, the Aura Creator, or both of these utilities. This is because Asus now offers this Lightening Control not as a separate option but in its Armory Crate. If you want to go a step further and want to have more options, installing the Creator Crate would be the better option.
Read more: 7 Best Asus Aura Sync Compatible Fans RGB/ARGB (2022) – Rated by Experts
i) Choose the option that you want to install and Click on “Start”. The process will start in the background. While it completes, you can stretch your legs as it will take a few minutes.

ii) Once this has finished installing, all you need to do is click on “launch Armory Crate” and your Sync will have finished installing, as well as downloading.

The only thing left to do after that would be to click on “I agree” to a few things after going through the details, such as


After you have gone through the details and you agree with them, you will finally be able to use the Software.

4. Things to Keep in Mind while Downloading Aura Asus
a) Motherboard BIOS Should be Updated
Asus has mentioned that in order for you to use the LED Control, you would need to have the updated BIOS for your motherboard. BIOS stands for Basic Input Output System. This is the first program that runs on your motherboard when you boot it up.
Updating Bios can be a tricky task. Especially because of how important it is to your Motherboard. Normally, we would not recommend you update your BIOS. But if you want to use Aura, this is necessary.
All Manufacturers offer updates for their BIOS themselves. This is because there are no compatibility issues. Normally, these updates come with bug fixes and new hardware support.
Read More: Best PC Build for Graphic Design in 2022
In order to update your BIOS, first, we would recommend you check if your BIOS needs updating or not. This can be done by,
i) Typing “System Information” in the “Search Bar”

ii) Find “BIOS Version/Date”
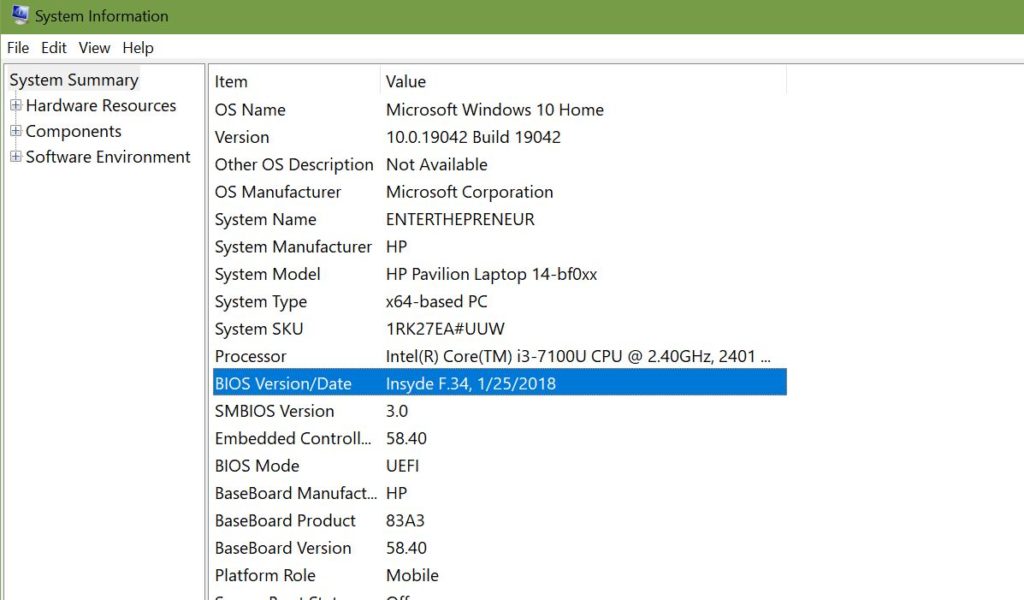
iii) Then Press “Windows Key + R” AND Type “cmd”

iv) and Typing “wmic bios get serialnumber”
This will give you your serial number for the BIOS as well as the Version.
You will then need to check if there are any new updates or not. In the case that there are, you will have two different options.
Read More: Best Coolers for CPU in 2022: Top Notch Coolers to Keep Your PC Super Cool
One is to update the BIOS directly from your particular manufacturer’s website.
Though for a safer option, we would recommend you go for the Second way. That is to download the BIOS in a USB directory first and then transfer it to your PC.
b) Any Previous versions of Aura should be Removed
Another specification by Asus is that in order for your Aura Software to work, you will need to have any previous versions of it uninstalled/removed from your PC. This is an easy process though so you don’t need to worry about it a lot.
i) Type “Remove Program” on your “Search Bar” AND Click on the option that you see.

ii) Find the Aura Sync app in the list.
iii) Click on the app AND Click on “Uninstall”.

c) Update Asus Drivers
Once the Asus Lightening Control Software has been downloaded, you will need to make sure that over the course of time that you have it with you, you update the drivers too. This will make sure you have the right drivers to keep the app running for a long time. As well as in some cases, provide you with extra functionality.
In order to install Asus Drivers, you can use one of two methods. One is to get them is to do it Manually while the other is to do it Automatically.
We would prefer you to go for the Automatic method as it will ensure that you save your time as well as the fact that you don’t get any extra headaches because of the process. As if you do it manually, you will first need to search for the drivers that need updating, then you will need to find them online too.

Download Drivers Automatically
In order to do this, you will need to get a third-party app that will scan your computer on its own, search for out-of-date drivers and then get them automatically.
For this, we would recommend you go for the Driver Booster 8 Free. It is a reliable software that will give you options for a paid version as well as a free one. You do get more functionality with the paid option but the free one would also be fine.
You just need to download the software from their website, set it up and it will do the rest itself.
Download Drivers Manually
In order to install the drivers manually, you will need to go to the respective company whose hardware you have. For Asus, you will need to
i) Go to their Download Center. Once there, Search for your model
ii) And then Click on the option of “Drivers and Tools”
Download the Drivers and then install them.
5. How to Sync Non-Compatible Components with Aura
Sadly, this method does not work for all of the Non-Compatible Components out there. And so if it doesn’t, the only other way left would be for you to get an LED strip that is Sync compatible.
In order to check if your Motherboard is Sync compatible or not, Use a ROG Terminal. If this works, you then have a motherboard that is compatible with the Lightening Control Software by Asus. The only thing left would be for you to connect your LED strips to your motherboard.
But again, in order for Aura Sync to work, you need both your Motherboard and your LED strips to be Compatible. If one of your hardware components is not, the only way is to get it changed with one that is.
6. Features Offered
There are a variety of different features that Aura offers. These are for customization, personalization, and for turning the lights either On/Off.
The Interface is really interactive so you can use the software pretty easily.
The two main things are either pairing up your hardware component or either setting up the different light effects.

Hardware
| 1. Motherboard |
| 2. VGA |
| 3. Keyboard |
| 4. DRAM |
Features
| Static | You can choose different colors for different components but they won’t change |
| Breathing | Just like static, the color does not change but they fade in and out |
| Color Cycle | You cannot choose a specific color for a component rather, the colors will cycle themselves randomly |
| Rainbow | Rainbow cycles through the colors like Color Cycle but chooses different colors for each component |
| Comet | The colors get cycled through one by one on each component. You can choose the speed and sequence |
| Flash & Dash | This is like Comet the colors stay on until the next one comes about |
| Strobing | This is like Comet but the colors don’t flash but rather fade away |
| Temparature | For this mode, the Lighting mimics your hardware’s temperature. |
| Music | This mode is based off of the music that you have |
| On & Off | This Option lets you turn the lights On or Off |